Laboratory 2
Calcolo numerico per la generazione di immagini fotorealistiche
Maurizio Tomasi maurizio.tomasi@unimi.it
A warning
It will take some time before you can produce photorealistic images (You didn’t want to end this course in two weeks, did you?!?)
The problem is that we need a lot of infrastructure before we can solve the rendering equation
Our first image will be a so-called black triangle, to use a well-known meme.
How to handle colors
Encoding a color
We saw that the colors perceived by the human eye can be encoded using three scalars R, G, B.
Our task for today is to implement a
Colordata type that encodes a color using three 32-bit floating-point numbers.We’ll deal with the conversion from RGB to sRGB next week, when we will talk about graphics formats (PNG, Jpeg, etc.)
As I did last week, I will show you a few examples in Python
Colors in Python
Let’s define a class named
Colorusing@dataclass(it’s likestructin C++):We can create colors using these syntaxes:
Operations on Color
- Sum two colors (like in L_\lambda^{(1)} + L_\lambda^{(2)})
- Scalar-color product (\alpha L_\lambda)
- Product between two colors (f_{r,\lambda} \otimes L_\lambda in the rendering equation)
- Similarity between two colors (useful for tests)
Example in Python
class Color:
    # ...

    def __add__(self, other):
        """Sum two colors"""
        return Color(
            self.r + other.r,
            self.g + other.g,
            self.b + other.b,
        )

    def __mul__(self, other):
        """Multiply two colors, or one color with one number"""
        try:
            # Try a color-times-color operation
            return Color(
                self.r * other.r,
                self.g * other.g,
                self.b * other.b,
            )
        except AttributeError:
            # Fall back to a color-times-scalar operation
            return Color(
                self.r * other,
                self.g * other,
                self.b * other,
            )

    # Etc.
The type HdrImage
- We’ll implement the type
HdrImagealongsideColor. It will be used to represent a HDR image as a 2D matrix ofColorinstances. - The task for today is to implement the following functionalities in
HdrImage:- Create an empty image with a given number of columns
(
width) and rows (height); - Read/write pixels.
- Create an empty image with a given number of columns
(
The Color matrix
The most natural type for a matrix is a 2D array with size
(width, height)……but it’s more efficient to use a monodimensional array with size
width × height. (This is not the case if you use Julia: just rely onMatrix!)Not every programming language supports 2D arrays (e.g., Kotlin), and if you use them in the wrong way, they can be inefficient:
Structure of HdrImage
In Python, we can implement
HdrImagein this way:The array of values has \mathtt{width} \times \mathtt{height} elements
However, we want to identify an element in the matrix using a pair
(column, row), i.e.,(x, y).
Accessing pixels
Given some position (x, y) for a pixel (with
x the number of the column and y the row), the
index in the array self.pixels can be calculated in this
way:

get_pixel and set_pixel
def get_pixel(self, x: int, y: int) -> Color:
    """Return the `Color` value for a pixel in the image

    The pixel at the top-left corner has coordinates (0, 0)."""

    assert (x >= 0) and (x < self.width)
    assert (y >= 0) and (y < self.height)
    return self.pixels[y * self.width + x]

def set_pixel(self, x: int, y: int, new_color: Color):
    """Set the new color for a pixel in the image

    The pixel at the top-left corner has coordinates (0, 0)."""

    assert (x >= 0) and (x < self.width)
    assert (y >= 0) and (y < self.height)
    self.pixels[y * self.width + x] = new_color
Can we avoid those repetitions?
Verifying your code
Why should we verify our code?
Errors are lurking around every corner!
This example was taken from a test in the TNDS course:
To verify the correctness of a function, we should call it with non-trivial data and check the result.
How can we verify our code?
Once we have written some code, we must verify its correctness by running it on inputs for which we can reasonably foresee the expected outputs.
The simplest way is to print the output and visually check it’s ok:
Can we do better?
Automatic tests
Checking calculations is boring and error-prone.
Computers have been invented to avoid doing repetitive and boring stuff!
Every modern language offers some built-in system to run tests automatically. (C++ is a notable exception, but there are lots of libraries that fill this gap.)
Automatic tests
Our starting point is this Python code:
color1 = Color(1.0, 2.0, 3.0)
color2 = Color(5.0, 6.0, 7.0)
print(color1 + color2)
print(color1 * 2)
We can improve it using assert:
Are we sure of our tests?
The fact that the new version of our Python scripts does not produce any output is expected, as the implementation is bug-free. But if we get no output, are we really sure that the tests were executed as expected?
A common trick is to implement wrong tests and make them fail:
color1 = Color(1.0, 2.0, 3.0)
color2 = Color(5.0, 6.0, 7.0)
assert (color1 + color2) == Color(6.0, 8.0, 11.0) # 11.0 instead of 10.0: wrong!
assert (2 * color1) == Color(3.0, 4.0, 6.0)       # 3.0 instead of 2.0: wrong!
Once we see that the tests failed, we can fix them and make them pass.
Testing floating-point values
In the tests we are going to write, we will have to use logical operations and comparisons (for Python, these are typically
==,<,>,<=,>=, etc.)We must handle floating-point numbers with special care!
Tricks for floating-point values
Avoid numbers with a decimal part, like
2.1or5.09, if possibleSmall integer numbers like
16.0are encoded without rounding, so prefer them in tests, if possible (we did so forColorin our Python example)As it’s not always possible to use integer numbers, implement a function
are_close(if your language doesn’t provide one already):
Code granularity and tests
Tests can provide a guidance for the implementation of types and functions.
Implementing
get_pixelandset_pixelleads to repetitions:def get_pixel(self, x: int, y: int) -> Color: assert (x >= 0) and (x < self.width) assert (y >= 0) and (y < self.height) return self.pixels[y * self.width + x] def set_pixel(self, x: int, y: int, new_color: Color): assert (x >= 0) and (x < self.width) assert (y >= 0) and (y < self.height) self.pixels[y * self.width + x] = new_colorWe must verify the correctness of coordinates twice 🙁
Repeating tests
We must verify that wrong coordinates are rejected both by
set_pixelandget_pixel:We can improve our code and tests by modularizing our implementation, i.e., we decompose it in simpler parts.
New implementation
def valid_coordinates(self, x: int, y: int) -> bool:
    return ((x >= 0) and (x < self.width) and
            (y >= 0) and (y < self.height))

def pixel_offset(self, x: int, y: int) -> int:
    return y * self.width + x

def get_pixel(self, x: int, y: int) -> Color:
    assert self.valid_coordinates(x, y)
    return self.pixels[self.pixel_offset(x, y)]

def set_pixel(self, x: int, y: int, new_color: Color):
    assert self.valid_coordinates(x, y)
    self.pixels[self.pixel_offset(x, y)] = new_color
Tests
Here are the tests for the new implementation:
img = HdrImage(7, 4)

# Check that valid/invalid coordinates are properly flagged
assert img.valid_coordinates(0, 0)
assert img.valid_coordinates(6, 3)
assert not img.valid_coordinates(-1, 0)
assert not img.valid_coordinates(0, -1)
assert not img.valid_coordinates(7, 0)
assert not img.valid_coordinates(0, 4)

# Check that indices in the array are calculated correctly:
# this kind of test would have been harder to write
# in the old implementation
assert img.pixel_offset(3, 2) == 17    # See the plot a few slides before
assert img.pixel_offset(6, 3) == 7 * 4 - 1
This kind of test is called unit test
Public/private methods
OOP programming encourages the declaration of some methods/fields as “private”, so that they cannot be invoked outside a class.
However, this practice makes the implementation of unit tests more difficult. Functions like
valid_coordinatesandpixel_offsetshould be declared “private”, but in this way we cannot invoke them directly in tests!The simplest solution is to define these functions as “public” so that we can write tests in the usual way, but to prepend their name with an underscore “
_”. (In Computer Science, it is customary to consider names like_valid_coordinatesand_pixel_offsetas private.)
Support functions for tests
- In our Python code, to check the correspondence between two colors,
we used
==, which works because we specified integer numbers:
- We will soon need to use \pi in our
calculations with colors, so define a function that compares the
“closeness” of two
Colorinstances:
Importance of Tests
Writing good tests is one of the skills that this course aims to develop.
Therefore, it is essential that your repositories demonstrate a regular implementation of tests, lesson by lesson.
Regularity in the implementation of tests and their quality is one of the criteria by which you will be assessed in the exam.
(Moreover, it will be a good showcase of your code cleanliness in the future!)
Importance of good commits!
Your GitHub or LinkedIn profile may be reviewed during job interviews
If you take good care of the repository for this course, it may serve as a “showcase” to include in your resume
Therefore, avoid writing vague comments in your commits!
Refer to the blog post Writing good commit messages
Group Work
From now on, you will work in groups: each of you will have to choose a part of the code to implement.
We will start using the advanced features of Git to manage conflicts, that is, situations in which a part of the code is modified simultaneously by multiple people.
Merge commit

Types of conflicts
- Two developers implement the same functionality:
- Choose one of the implementations
- Merge them together
- Two developers implement separate functionalities in the same code
location:
- If they can coexist, keep them together (as in the previous video example)
- If not, separate them into two different files
- Two developers implement incompatible functionalities:
- Decide which functionality to maintain and which to discard…
- …or one of the developers quits!
What to do today
What to do today
Choose a project name (we will use
myraytracerfor this exercise).Structure the project as follows:
- A library implementing
ColorandHdrImageclasses, and their operations - A console application that imports the library, but for now only prints “Hello, world!”
- A series of automated tests for
ColorandHdrImageclasses
- A library implementing
Commit the project to GitHub, add team members, and send an email to the teacher (maurizio.tomasi@unimi.it.)
Don’t be afraid of creating conflicts and performing merge commits: the more you practice with them, the easier it will be in the future.
Group work
In each group, only one person should create the project skeleton, create the GitHub page, and save it.
The other group members become project collaborators (see the following slide for more information).
Think about how to divide the work among group members; for example, for
Color:- Sum of two colors
- Product of two colors, and color-scalar product
are_colors_closefunction- Tests

Working in a Team
Each of you will need to run
git pushon your repository on GitHub to send your changes (“commit”) to the serverOnce this is done, your team members can download the changes using
git pullA way to divide the work is for one of you to implement a method (e.g.,
valid_coordinates) while the other writes the test simultaneously:valid_coordinates+ test;pixel_offset+ test;get_pixel/set_pixel+ test.
Properties of Color
Three fields
r,g,bof type 32-bit floating-point: they don’t need 64 bits, and would actually waste memory and processing timeFor OOP languages, don’t lose time writing getters and setters like
GetR, etc.: they are long to write, prone to errors, and make the code harder to readA method/function that checks if two colors are similar (useful for testing);
Addition of colors;
Multiplication of color and color or color and scalar;
If appropriate, implement a function that converts an object into a string (e.g.,
<r:1.0, g:3.0, b:4.0>): it will be handy for debugging
Memory usage
Most programming languages differentiate between value and reference types.
Value types are direct values that can be accessed directly, and are always allocated on the stack: they are very fast to use, but cannot take up much memory (usually only a few kilobytes).
Reference types are pointers to the actual data, and can be allocated on the stack or heap: they can consume all available memory, but are slower to access and manipulate.
Exceptions include languages based on the Java Virtual Machine (Java, Kotlin, Scala, etc.), where there are only reference types (although the JVM may automatically convert values to references if it deems it beneficial).

An example using C++
#include <iostream>
#include <vector>

int main() {
    int a{};                     // Allocated on the stack
    int * b{new int};            // Allocated in the heap
    int c[] = {1, 2, 3};         // Allocated on the stack
    std::vector<int> v{1, 2, 3}; // "v" on the stack, but the three numbers in the heap

    a = 15;   // This is fast
    *b = 16;  // This is slower

    std::cout << a << ", " << *b << "\n";
    // Output:
    // 15, 16
}
In Python, any variable (even integer variables like
x = 1) is allocated on the heap (one of the reasons why it
is much slower than C++)
Stack size
For programs written in C/C++/Fortran/Julia, the stack size is set by the operating system. On systems using Posix (such as Linux/macOS), you can find the value in KB using the command
ulimit -s:$ ulimit -s 8192The value of 8 MB is characteristic of Linux; for macOS, it is 0.5 MB.
For the .NET platform (including Visual Basic and C#), a 1 MB stack is used.
The JVM (Java, Kotlin) uses a 1 MB stack, which is only used for primitive types (integers, booleans, floating-point numbers).
Value types
The
Colorclass is quite small: it requires 3 floating-point numbers in memory, making it a good candidate for a value type (this is not true forHdrImage).The way you ask for a value type depends on the programming language:
- In C++, both
structandclasscan be used (they are equivalent), but when using them, avoid usingnewanddelete. - In C# and D,
structis used for value types (but notclass), whileclassis used for reference types. - In Pascal,
objectorrecordcan be used, but notclass. - In Nim,
objectcan be used, but notref object. - In Julia, the
StaticArrayspackage can be used.
- In C++, both
Test (1)
Creating
Colorobjects and using theis_closefunction:It is important to test that
is_closereturnsFalsewhen necessary (note that this is a negative test):
Test (2)
Sum/product between colors:
Color-scalar product (you can implement scalar-color too, if you want):
Test (3)
def test_image_creation():
    img = HdrImage(7, 4)
    assert img.width == 7
    assert img.height == 4

def test_coordinates():
    img = HdrImage(7, 4)

    assert img.valid_coordinates(0, 0)
    assert img.valid_coordinates(6, 3)
    assert not img.valid_coordinates(-1, 0)
    assert not img.valid_coordinates(0, -1)
    assert not img.valid_coordinates(7, 0)
    assert not img.valid_coordinates(0, 4)

def test_pixel_offset():
    img = HdrImage(7, 4)

    assert img.pixel_offset(0, 0) == 0
    assert img.pixel_offset(3, 2) == 17
    assert img.pixel_offset(6, 3) == 7 * 4 - 1

def test_get_set_pixel():
    img = HdrImage(7, 4)

    reference_color = Color(1.0, 2.0, 3.0)
    img.set_pixel(3, 2, reference_color)
    assert are_colors_close(reference_color, img.get_pixel(3, 2))
Hints for C++
Numeric types
Be aware that C++ uses weird rules to establish the size of the types. Depending on the CPU/operating system/compiler you use,
intmight be a 16-bit, 32-bit, or 64-bit integer. This can cause many portability issues!The recommended way to overcome this problem is to always use the types defined in
<cstdint>:int8_t,uint8_t,int16_t,uint16_t, etc.(This approach makes C++ more similar to Rust, which has built-in types like
u8,i8,u16,i16, …)It’s ok to use
intfor the counter used inforloops (for(int i{}; i < …; i++)), if you expect its maximum not to be too large, as the size ofintis usually chosen to be the fastest integer type supported on the machine.
Running tests
With Xmake, it is trivial to run tests, as it implements the command
xmake test. See the manualIf you use CMake, things are more complicated. You must rely on CTest, which is a companion program developed by KitWare.
Using CMake/CTest
Create this directory tree:
$ tree raytracer
raytracer
├── CMakeLists.txt
├── include
│   └── colors.h       <-- Definition of "Color"
├── src
│   ├── colors.cpp     <-- Implementation of "Color" (if you *really* need it!)
│   └── raytracer.cpp
└── test
    └── colors.cpp     <-- Tests for the class "Color"
If you implement all the methods for
Colorsininclude/colors.h(highly recommended! this makes the code faster), there is no need ofsrc/colors.cpp.
CMakeLists.txt
CMake will have to create three products:
- A library that implements
Color; choose a name for it (we will usetrace). - An executable program that uses the library, which we will call
raytracer. At the moment it is enough that it printsHello, world!. - A program that runs the tests, which we will call
colorTest.
- A library that implements
To create programs we know that there is the
add_executablecommand; for libraries there is the analogousadd_library.The dependencies between the
tracelibrary and programs are specified withtarget_link_libraries.
Libraries and Executables
The sequence of libraries and executables to produce is specified as follows:
add_library(trace src/colors.cpp ) # This is needed if we keep .h files in the "include" directory target_include_directories(trace PUBLIC $<BUILD_INTERFACE:${CMAKE_CURRENT_SOURCE_DIR}/include> $<INSTALL_INTERFACE:include> ) add_executable(raytracer src/raytracer.cpp ) target_link_libraries(raytracer PUBLIC trace) add_executable(colorTest test/colors.cpp ) target_link_libraries(colorTest PUBLIC trace)target_include_directoriesspecifies where to look forcolors.h.
Running Tests
To run automatic tests, you need to invoke two commands in
CMakeLists.txt:enable_testingenables the ability to run tests, and should be written immediately after theprojectcommand.add_testspecifies which of the executable files to produce actually runs tests. (You can use it multiple times).
In our case, we will invoke
add_testonly once to runcolorTest.To run the tests, in the
builddirectory, simply invokectest.
CMakeLists.txt
This is the complete content of CMakeLists.txt:
cmake_minimum_required(VERSION 3.12)

# Define a "project", providing a description and a programming language
project(raytracer
  VERSION 1.0
  DESCRIPTION "Hello world in C++"
  LANGUAGES CXX
  )

# Force the compiler to use the C++23 standard (or whatever you want)
set(CMAKE_CXX_STANDARD 23)

# If the compiler does not support the standard, stop!
set(CMAKE_CXX_STANDARD_REQUIRED ON)

# Turn on the support for automatic tests
enable_testing()

# This is the library. Pick the name you like the most; we use "trace"
add_library(trace
  src/colors.cpp
  )
# Help the compiler when you write "#include <colors.h>"
# See "cmake-generator-expressions(7)" in the CMake manual
target_include_directories(trace PUBLIC
  $<BUILD_INTERFACE:${CMAKE_CURRENT_SOURCE_DIR}/include>
  $<INSTALL_INTERFACE:include>
  )

# This is the program that we will run from the command line
add_executable(raytracer
  src/raytracer.cpp
  )
# The command-line program needs to be linked to the "trace" library
target_link_libraries(raytracer PUBLIC trace)

# This program runs the automatic tests on the "Color" class
add_executable(colorTest
  test/colors.cpp
  )
# The test program too needs to be linked to "trace"
target_link_libraries(colorTest PUBLIC trace)

# Here we specify that "colorTest" is a special executable, because
# it is meant to be run automatically whenever we want to check our code
add_test(NAME colorTest
  COMMAND colorTest
  )
Test Operation
Running Tests
Try modifying one of the tests on the
Colortype so that it fails:- Change the
test/colors.cppfile - Go to the
builddirectory and runctest - Commit the changes
- Send the changes to GitHub with the
git pushcommand
- Change the
It would be good if each group member tried to do this.
Suggestions
- If the build does not fail, it is probably because
the
Releasebuild type is used instead ofDebug, and you usedassertin your code. - Solutions:
- Lesson: always try to make one or more tests fail!
Hints for C#
Solutions and Projects

The
dotnetcommand supports the creation of solutions and projects.A progetto is anything that can be produced from source C# files (executables, libraries)…
A solution is a collection of projects. Each element of the diagram is a project, and the whole diagram is a solution.
Creating solutions/projects
To create a solution, run
dotnet new slnProjects in
dotnetcan be of three types:- Executables (
dotnet new console) - Libraries (
dotnet new classlib) - Automatic tests (
dotnet new xunit)
- Executables (
To specify that project
Adepends onB, writedotnet add A reference BTo add new projects to a solution, use
dotnet sln add
Our “solution”
# Create a new solution that will include:
# 1. The library
# 2. The executable (currently printing «Hello, world!»)
# 3. The tests
dotnet new sln -o "Myraytracer"

cd Myraytracer

# 1. Create the library, named "Trace", and add it to the solution
dotnet new classlib -o "Trace"
dotnet sln add Trace/Trace.csproj

# 2. Create the executable, named "Myraytracer", and add it to the solution
dotnet new console -o "Myraytracer"
dotnet sln add Myraytracer/Myraytracer.csproj

# 3. Create the tests, named "Trace.Tests", and add them to the solution
dotnet new xunit -o "Trace.Tests"
dotnet sln add Trace.Tests/Trace.Tests.csproj

# Both the executable and the tests depend on the «Trace» library
dotnet add Myraytracer/Myraytracer.csproj reference Trace/Trace.csproj
dotnet add Trace.Tests/Trace.Tests.csproj reference Trace/Trace.csproj

# Create a .gitignore file
dotnet new gitignore
Do everything from the command line and then open the project in Rider: it’s more instructive!
Directory tree
This solution has generic names for each file, so it is wise to change them into something easier to recognize.
Rename the files so that they have the following structure:
Myraytracer
├── Myraytracer.sln
├── Myraytracer
│   ├── Myraytracer.cs      <-- This was Program.cs
│   └── Myraytracer.csproj
├── Trace
│   ├── Color.cs            <-- This was Class1.cs
│   ├── HdrImage.cs         <-- New file
│   └── Trace.csproj
└── Trace.Tests
    ├── ColorTests.cs       <-- This was UnitTest1.cs
    ├── HdrImageTests.cs    <-- New file
    └── Trace.Tests.csproj
Writing tests
// This should be put in Trace.Tests/ColorTests.cs
using System;
using Xunit;
using Trace;

namespace Trace.Tests
{
    public class ColorTests
    {
        [Fact]
        public void TestAdd()
        {
            Color a = new Color(1.0f, 2.0f, 3.0f);
            Color b = new Color(5.0f, 6.0f, 7.0f);
            // C# convention: *first* the expected value, *then* the test value
            Assert.True(Color.are_close(new Color(6.0f, 8.0f, 10.0f), a + b));
            // ...
        }
    }
}
You can run tests with dotnet test, but you can also use
Rider (this is so handy! Refer to the slides for
Kotlin.)
Hints for Java/Kotlin
Handling projects
IntelliJ IDEA is based on Gradle, which is the analogous of CMake for C++.C++.
Gradle can be programmed using Groovy (a language derived from Java) or Kotlin.
As Java and Kotlin are highly modular, for this course there is no need to differentiate between a library and an executable.
Therefore, you can create a project exactly like you did last week.
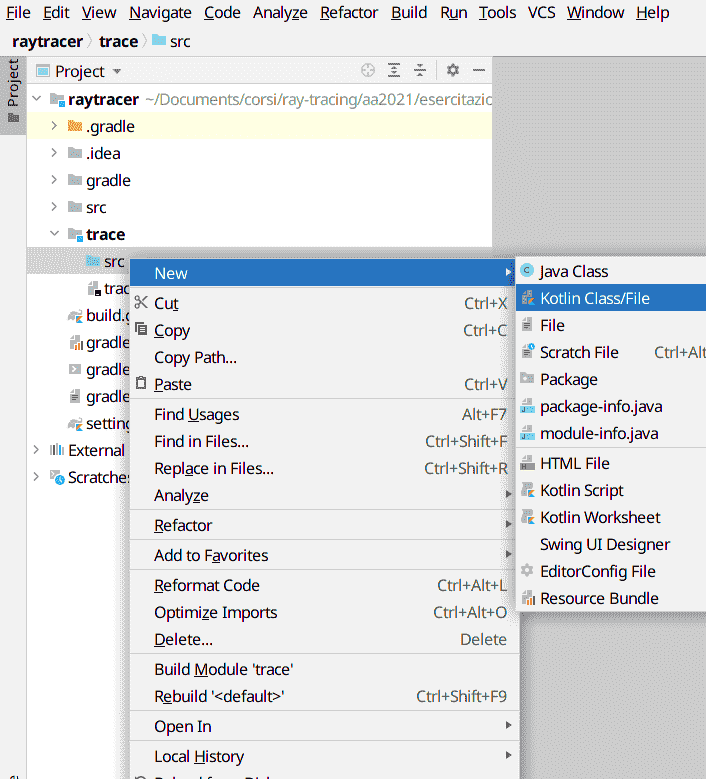
Creating classes
In IntelliJ IDEA, you can create new classes via the Project window (on the left):
The Color class
In Kotlin, use data classes to define
Color: they are so easy to use!Define
is_closeand operatorsplus(sum of two colors) andtimes(product between a color and a number).
The HdrImage class
Kotlin lets you to define classes in a compact form (a dream for whoever has used Java!). Here is an example:
Be sure to understand the difference between
valandvar!
Writing tests
IntelliJ IDEA generates and handles tests automatically.
You should use JUnit; if the IDE asks you which version to use, pick 5.
Check the version you are using by opening menu «File | Project structure».
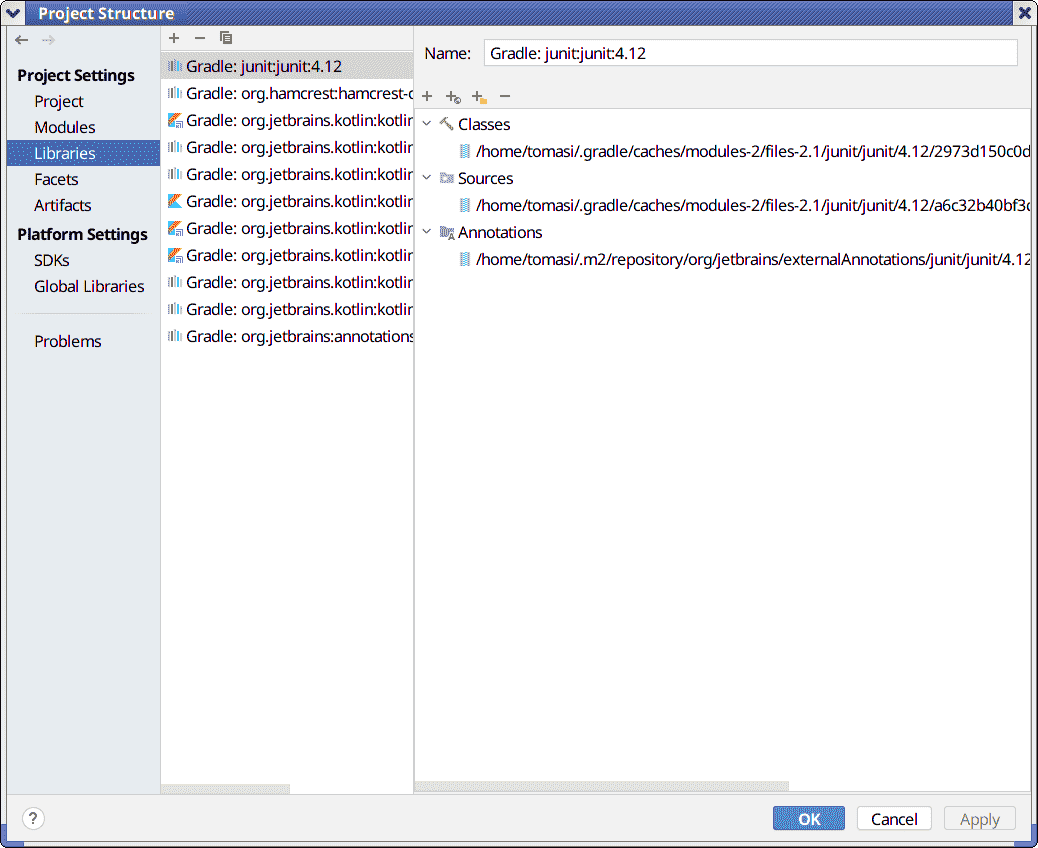
In this screenshot, JUnit’s version is 4.
Creating empty tests
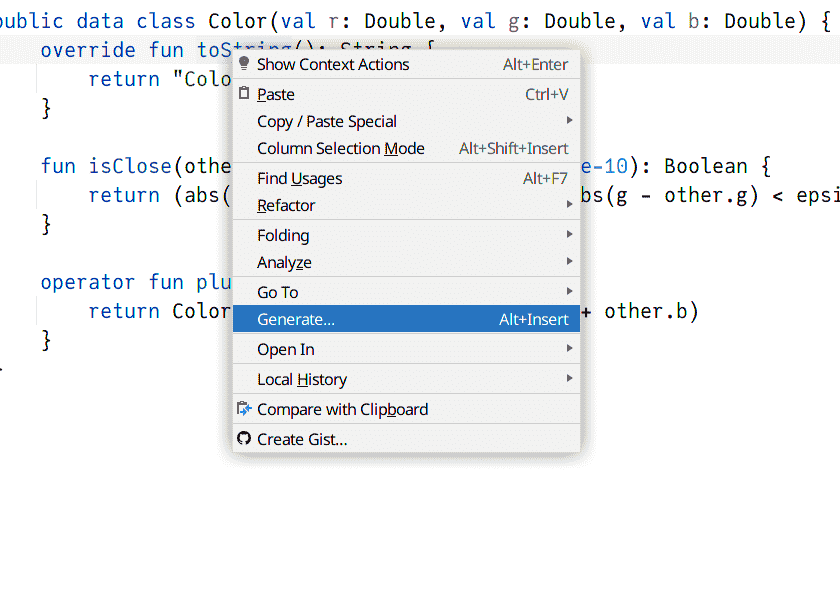
Right-click on a class name and pick Generate.
In the window, pick the right version for JUnit and choose the methods that you want to test. (In our case, they are
is_close,plus, andtimes).Once you have implemented the tests using
assertTrueandassertFalse, run them using the icons on the left.
Generating tests
Running tests

Hints for Rust
Code Structure
For today, it is not necessary for you to structure the code into complex modules.
Create a
basictypes.rsfile in which you will define both theColortype and theHdrImagetype, along with all the tests associated with them.You can leave the
main.rsfile intact for the moment (with theHello, world!message).To automatically format the code, use the
cargo fmtcommand.
Type Definition
For
Color, derive theCopy,CloneandDebugtraits to simplify your life:For
HdrImage, define thepixelsmember of typeVec<Color>.Also define a function
create_hdr_image(width: i32, height: i32) -> HdrImage, which initializespixelscorrectly.
Tests in Rust
Rust natively supports tests using the
#[cfg(test)]and#[test]annotations.Tests can be executed automatically with the command
$ cargo testConsult the Rust guide; a more in-depth discussion can be found in chapter 11 of The Rust Programming Language (Klabnik & Nichols).
Hints for Nim
Type Definition
Implementing the
ColorandHdrImagetypes should be elementary.Make sure to use
objectand notref objectfor Color, while forHdrImageit is indifferent.Remember that in Nim you need to export both the types and their members, using
*:
Creating HdrImage
In Nim, constructors like in C++ are not needed.
The common practice is to define a
newMyTypefunction that creates theMyTypetype.Therefore, add a
newHdrImageprocedure that accepts two parameterswidthandheight, initialize thepixelsfield usingnewSeq, and set all colors to zero (black).
Writing Tests
In Nim, you can use the
asserttemplate to run tests.The practice is to create Nim files inside the
testsdirectory; if these files start witht, they are automatically executed by the command$ nimble testTo write tests for the
ColorandHdrImagetypes, create atests/test_basictypes.nimfile like this:
Hints for Julia
Package Structure
Julia natively implements the required structure type (library, executable, executable with tests):
- Each package can be used as a library;
- Packages can include a set of tests if they have a directory called
testinside; - The script that implements
mainseen in the previous exercise can be used as an executable.
Creating a new package therefore configures everything already in the required way, except for the executable.
Creating the Package
Create a new package with the commands seen last time:
Julia supports color management through ColorTypes and Colors:
This will modify
Project.tomland addManifest.toml, which should be saved in Git (look at what they contain!).
Color Operations
For today, there is no need to understand the difference between value and reference types, because you will be using Colors and ColorTypes.
The Colors library implements a series of template types:
However, the library does not implement the color operations that interest us (sum, difference, product, comparison). Implement them yourself in the
src/Raytracer.jlfile (the file name depends on your project name).
Complications
The types in ColorTypes are parametric (like templates in C++): the
RGBtype is actuallyRGB{T}, withTas a parameter.You need to redefine the fundamental operations
+,-,*and≈(\approx), which in Julia are present in theBasepackage.You will need to write something like this in
src/Raytracer.jl:
Creating Tests
To implement the tests, create a
test/runtests.jlfile, so that the directory structure is as follows:To write tests, you need to add the Test library:
How to Write Tests
In the
runtests.jlfile, you need to write the test procedures. The Test library implements the@testset(groups tests) and@testmacros:To run them from the REPL, write
Running Tests
The Manifest.toml File
- Julia uses the
Project.tomlfile to indicate general information about the package, and it can be edited. - The
Manifest.tomlfile is generated automatically, and it pins the version numbers of the dependencies used by your package. - It is essential to add the
Project.tomlfile to Git. - For
Manifest.tomlthere are two possibilities:- If you believe it is essential that every user uses exactly your versions of the dependencies, add it;
- If you want to guarantee more versatility, exclude it from Git (thus
adding a line to
.gitignore).
Hints for D
Definition of the types
Define
Coloras astructandHdrImageas aclass; forColor, include defaults:Define
pixelsinHdrImageas a dynamic arrayDefine a constructor for
HdrImagethat requireswidthedheightand initializespixelsallocating the correct length. Then set the color of every pixel to black.
Tests in D
D offers excellent support for tests via the keyword
unittest(it’s awesome!)It’s not needed to define tests in separate files, as it is the case for C++ and C#.
To run the tests, execute the command
$ dub testSee the documentation for more information: Unit tests